Setting-up an APRS iGate and Digipeater in Linux October 21, 2012 6 Comments
As a long time Amateur Radio Operator (callsign: KB8MON), I recently explored more into APRS, the Automatic Packet Reporting System. This interest was driven by another interest in High Altitude Balloons (HAB), and how they might be tracked. I live in downtown Detroit, and found that there is a vacuum here of what are called “APRS digipeaters” and “APRS igates” in the area. APRS Digipeaters are stations that repeat the location beacons of other more mobile APRS stations (or balloons in my case), and igates, that serve a similar purpose toward relaying this digital APRS location information to the Internet via aprs2.net.
To get this going, you need:
- An Amateur Radio (Ham) License
- 2 Meter Radio
- TNC Modem
- Computer (i.e. Internet Gateway)
Here is what I came up with:

An Amateur Radio (Ham) License
I happened to already have this, but to get a new ham license, you will need to study up on the FCC requirements for getting one, but the test is not very hard. Then you need to find a testing location in your area http://www.arrl.org/find-an-amateur-radio-license-exam-session
2 Meter Radio
Pretty much any 2 meter ham radio will work for this. You just need to find one that has a microphone and speaker jack that will be used to transmit and receive the radio beacons, and set it to the 144.390 frequency, which is generally used in the US for APRS. I used an old-school Icom 32-AT transceiver.
TNC Modem
The TNC modem is a device that translates the audio from the radio into digital data. Pretty much the only current manufacturer of these are from a company called Byonics. I purchased their TinyTrak4 device that cost around $75 assembled, and it works great.
Computer
Although you can use any computer for this, you probably don’t want a giant desktop or laptop, as the CPU and memory required are rather small. So, I went with a Raspberry Pi computer that runs on an ARM chip, and only costs around $35. This computer runs an OS based on Debian called Raspian, and is connected to the TNC modem via a USB to Serial adapter, and to the Internet via a USB 802.11 WiFi adapter. I set it up to automatically connect to my home’s WiFi, as well as to automatically start a program in Linux called APRX.
Results
So, after it is all setup and running, you can watch as you relay and record on the internet the location and tracking information of other APRS people around you. The output looks like:
2012-10-21 21:16:56.243 KB8MON R VE3KCR>APN383,MTCLMN*,KB8MON-1*,WIDE2*:!4226.14NS08206.23W#PHG7640/W2,SONTn,Chatham - ve3cih@rac.ca 2012-10-21 21:17:28.337 KB8MON R KB8MON-1>KB8MON,WIDE1,WIDE2:/000000h4222.75N008305.76WI000/000Downtown Detroit iGate/Digi rob@wayne.edu/A=003281 2012-10-21 21:18:28.380 KB8MON R KB8MON-1>KB8MON,WIDE1,WIDE2:/000000h4222.75N008305.76WI000/000Downtown Detroit iGate/Digi rob@wayne.edu/A=003281 2012-10-21 21:18:47.029 APRSIS R BANCFT>APRX22,TCPIP*,qAC,W8FSM-JS:W8FSM 2012-10-21 21:19:28.424 KB8MON R KB8MON-1>KB8MON,WIDE1,WIDE2:/000000h4222.75N008305.76WI000/000Downtown Detroit iGate/Digi rob@wayne.edu/A=003281 2012-10-21 21:19:28.990 APRSIS R LANSNG>APRX21,TCPIP*,qAC,W8FSM-JS:!4245.28NS08431.53W#W2,MIn W8FSM Lansing Digi/IGATE 2012-10-21 21:20:18.134 KB8MON R VA3OT>CQ,VE3KCR*,MTCLMN*,WIDE2*:> " Maple City Weather " 2012-10-21 21:20:20.504 KB8MON R SHLBTP>APOT21,MTCLMN*,WIDE2*:!S8vEy9NF4# stPHG3170 W2,MIn Grid EN82lp WF5X 2012-10-21 21:20:27.560 APRSIS R JAMTWP>APRX23,TCPIP*,qAC,W8FSM-JS:W8FSM 2012-10-21 21:20:28.468 KB8MON R KB8MON-1>KB8MON,WIDE1,WIDE2:/000000h4222.75N008305.76WI000/000Downtown Detroit iGate/Digi rob@wayne.edu/A=003281 2012-10-21 21:20:35.070 KB8MON R VA3OT>CQ,VE3KCR*,MTCLMN*,WIDE2*:@212122z4224.00N/08210.00W_208/001g008t059r000p000P000h00b10166.DsVP |
In case you are interested in what settings/configuration I used for the Bionics TinyTrak 4 Device, here they are:
BANK is 0 P300 is FALSE TXTDISP is FALSE NODISP is FALSE PPATHING is FALSE DMSDISP is FALSE MICETMV is FALSE ENTS is FALSE TELHIRES is FALSE TELVOLT is TRUE TELTEMP is TRUE PREEMPT is TRUE DIGIID is TRUE WXPOS is TRUE TELREAD is TRUE FRAWDISP is FALSE HRAWDISP is FALSE WYPTXT is FALSE PKTICOM is TRUE PKTOCOM is TRUE RPATHDISP is FALSE LEDS is TRUE PAVPEN is FALSE DEC96 is FALSE DDIST is FALSE HEADERLN is FALSE DMETRIC is FALSE SOFTRST is TRUE MSGCMD is TRUE MSGCAP is FALSE LRNTPS is FALSE GPSCHK is FALSE INTCLK is FALSE TOSV is FALSE TALT is TRUE TSPEED is TRUE TIMESTAMP is TRUE TIMEHMS is TRUE SBEN is FALSE TSWPT is TRUE AMODE is KISS BMODE is GPS ABAUD is 19200 BBAUD is 4800 BNKMODE is 0 SSIDROUTE is 0 ALTNET is KB8MON MYCALL is KB8MON-1 PATH1 is WIDE1 PATH2 is WIDE2 PATH3 is TSTAT is Downtown Detroit iGate/Digi rob@wayne.edu BTEXT is >Downtown Detroit iGate/Digi rob@wayne.edu BPERIOD is 900 TXD is 100 MTXD is 10 PERSIST is 0 SLOTTIME is 0 QUIET is 0 TRNKMODE is 0 CDMODE is TONES CDLEVEL is 20 TXLEVEL is 90 TXTWIST is 50 RXAMP is 13 GWAYLEN is 232 GWAYMODE is NMEA GRELAYBITS is 1 GRELAYRATE is 1 GKRELAY is 0 LOCATION is 4222.7500N 08305.7600W GALT is 1000 TSYMCODE is I TSYMTABLE is 0 STATUSRATE is 1 PPERIOD is 60 MPPERIOD is 0 SBSSPEED is 5 SBFSPEED is 60 SBSPERIOD is 1800 SBFPERIOD is 90 SBTANGLE is 27 SBTSLOPE is 255 SBTTIME is 5 MMSG is 2 TSOFFSET is 17 TDAO is 0 TPROTOCOL is APRS TPSWITCH is 0 TPERIOD is 0 TVOLTTWK is 128 TTEMPTWK is 128 WPERIOD is 0 ALIAS1 is WIDE1 ALIAS2 is WIDE2 ALIAS3 is WIDE3 DUPETIME is 30 FILTERCALL is |
Also, if you are interested in the configuration file (/etc/aprx.conf) for APRX, here it is:
mycall KB8MON <aprsis> server noam.aprs2.net 14580 </aprsis> <logging> pidfile /var/run/aprx.pid rflog /var/log/aprx/aprx-rf.log aprxlog /var/log/aprx/aprx.log </logging> <interface> serial-device /dev/ttyUSB0 19200 8n1 KISS tx-ok true </interface> <digipeater> transmitter $mycall <source> source APRSIS relay-type third-party via-path WIDE1-1 msg-path WIDE1-1 </source> </digipeater> |
Here is what the whole thing looks like closed in an Ikea box ;)

Windows Phone 7 and Zimbra September 28, 2011 3 Comments
![]()
I’ve been testing Windows Phone 7. Specifically, its compatibility with Zimbra. I am very impressed. I have to admit that I am an entrenched critic of Microsoft, and was recently reminded by a colleague why this is: http://en.wikipedia.org/wiki/Embrace,_extend_and_extinguish. Regardless of this, M$ has done a great job in implementing a mobile platform that works almost flawlessly with Zimbra and implements a standards-compliant version of ActiveSync. Given that ActiveSync is a Microsoft product, and that their phone talks this protocol talks flawlessly with any ActiveSync service, should not be a surprise to me, but it is a wonderful feat of engineering that few beyond Microsoft have been able to perfect.
I have to say that I am strangely drawn toward the platform in its simplicity and basic function. I miss the days of the non-graphical Blackberry OS with the text-based email and calendaring functions. The Windows 7 platform reminds me of this basic and flawless function. Android and iPhone seem to be riddled with a buggy glitz that is absent in the nearly perfectly executed Windows Phone 7 OS. Also impressive is that the OS provides great integration with services such as Facebook, and provides great mash-ups with your contacts too.
What I can’t deal with is the lack of popular apps. I am a hopelessly involved in the “app” culture of the iPhone and Android markets, and can’t give that up. However, if you’re a person who only cares about their contacts and email, and primarily use an ActiveSync server such as Exchange or Zimbra, I couldn’t recommend a better OS than Windows Phone 7. Hopefully, we don’t see the “extinguish” phase come too soon =).
Zimbra Backup Replication with RSYNC June 27, 2010 1 Comment
An Overview of Zimbra Backups
Creating a viable replica of a Zimbra backup can be a challenging task and the key to doing it right is to understand how Zimbra backups are structured and scheduled. The RSYNC tool is an excellent choice for an offsite replica of your Zimbra mailstore backup, as it provides options to deal with the structure. The first thing to consider is how you are backing up Zimbra in the first place. Here is a typical crontab entry detailing when and how zmbackup is called.
0 1 * * 1 /opt/zimbra/bin/zmbackup -f -a all 0 1 * * 0,2-6 /opt/zimbra/bin/zmbackup -i 0 0 * * * /opt/zimbra/bin/zmbackup -del 3m |
Translated to English, this states that Zimbra is going to:
- Line1: Do a full backup of all accounts at 1:00am on Monday
- Line2: Do an incremental backup Sun, Tues, Weds, Thurs, Fri and Sat
- Line3: Get rid of any backups that are older than 3 months, and check for this every day at midnight
Now, when Zimbra does its backup job, by default it puts the backup files in /opt/zimbra/backup. If you look in this directory, you will see something similar to this:
drwxr-xr-x 5 zimbra zimbra 4096 Jun 27 01:24 . drwxr-xr-x 54 root root 4096 Mar 28 02:23 .. -rw-r----- 1 zimbra zimbra 1750611 Jun 27 01:24 accounts.xml drwx------ 2 root root 16384 Apr 26 2009 lost+found drwxr-x--- 148 zimbra zimbra 12288 Jun 27 01:24 sessions drwxr-x--- 13 zimbra zimbra 4096 Jun 27 01:24 tmp |
The accounts.xml file contains vital information about the backups. Zimbra requires this information in the case of a restore and without this file, your backup will be useless. The information in this file includes:
- The translation between the Zimbra UUID for a person and their account name
- Where to look for the most recent full backup of an account
In your sessions directory, you should see the actual backup directories:
drwxr-x--- 5 zimbra zimbra 4096 Jun 24 01:23 full-20100624.052333.282 drwxr-x--- 5 zimbra zimbra 4096 Jun 25 01:20 full-20100625.052028.170 drwxr-x--- 5 zimbra zimbra 4096 Jun 26 01:30 full-20100626.053024.490 drwxr-x--- 5 zimbra zimbra 4096 Jun 27 01:24 full-20100627.052414.328 drwxr-x--- 5 zimbra zimbra 4096 Mar 27 02:05 incr-20100327.050647.501 drwxr-x--- 5 zimbra zimbra 4096 Mar 31 01:25 incr-20100331.050704.213 drwxr-x--- 5 zimbra zimbra 4096 Apr 1 01:21 incr-20100401.050711.294 drwxr-x--- 5 zimbra zimbra 4096 Apr 2 01:27 incr-20100402.050621.529 ... |
Zimbra automatically uses hard links to reference message files between backup sets that have not changed since the last backup. By only storing a message for a user once, this keeps the total size of your /opt/zimbra/backup/ directory to a minimum. However, you must consider these hard links when designing your backup solution. Otherwise, you can easily make this mistake:
- If you blindly copy this data to another directory without considering the hard links, it will balloon in size at the target location, because the hard links between full backups will not be preserved and each full backup will be the full size of your mailstore. These backups should still be viable, but it would be a huge waste of space.
If you want true point-in-time recovery, you need to copy everything in /opt/zimbra/backup/ while preserving hard links. You should not pick and choose what to copy.
If you were hard-up to do something quick, a minimum emergency backup of Zimbra would include only taking the most recent full backup directory in /opt/zimbra/backup/sessions/, while preserving the /opt/zimbra/backup/ directory structure otherwise, along with the necessary accounts.xml file. However, this is not recommended. Zimbra intends for everything in /opt/zimbra/backup/ to be replicated and managed as a whole, and if you start picking it apart, you definitely will not have point-in-time recovery, and you run the risk of not getting everything that Zimbra needs to do a full restore. If you choose to pick apart the Zimbra backup scheme, make sure you understand entirely how it all works first. Also, if you use auto-group mode and if you replicate only the most recent full backup from a list of many available, a incomplete replica is all but guaranteed.
Replication with RSYNC
Zimbra stores individual messages in individual files. For small Zimbra installations, this is not a large management problem. For very large zimbra installs, this can be challenging to work with. In fact, it’s almost impossible to do this with any version of RSYNC before version 3. For more about this, see the post I did a few years ago. Since then, RSYNC has introduced a life-saving feature (“–recursive”). This is only available in RSYNC v3 and allows RSYNC to recursively traverse directories and start the initial transfer from sources with millions of files very quickly. Depending on the size of your backups, and with RSYNC v2, it could take days to even start transferring files from a Zimbra backup directory.
So, there are 2 important switches that you need to pass your RSYNC v3 process to create a fast, viable backup are:
- –recursive This takes advantage of the recursive logic in RSYNC v3
- -H This will preserve hard links, and keep the size of your /opt/zimbra/backup/ replica under control
And here it is put into an RSYNC command:
rsync -avzH --exclude="lost+found" --recursive --delete -e ssh zimbra@zimbra.server.com:/opt/zimbra/backup /my/local/replica/ > /my/local/replica.log |
This assumes that you have an SSH key pair setup. Remember that RSYNC simply copies data from the source to the target. If you mistakingly delete your /opt/zimbra/backup/sessions/ directory or make some other horrible mistake, it will replicate that mistake. It is good practice to turn off your RSYNC replication before making any major changes as this replicate may be your only safeguard.
Now, about scheduling.. Run your rsync task after Zimbra typically completes its full backup and incremental backups, and leave enough time to ensure that the RSYNC completes before starting the next Zimbra backup. Depending on the size of your mailstore, this may mean staggering your Zimbra and RSYNC replica operations to each occur every other day.
Good luck with your Zimbra backup replication!
How To: 330 Gallon Rain Barrel June 6, 2010 5 Comments
Here is some information about my two 330 rain barrels. This might help you if you are interested in saving some money on your water bill and keeping a fair amount of the rainfall over your property off the watershed and from becoming just wasted runoff.

A lot of sites out there sell those 50 gallon drums for rain collections. I don’t recommend them. Regardless of the size house you have, you will easily overflow one of those things with a sprinkle of rain. I’ve even found this 330 gallon barrel to be too small, so I have installed 2, one in the front of the house and one in the back for a total of 660 gallons of rain collection.
Adding some fair size rain barrels/containers to your property is surprisingly easy and cheap. The first thing you need to do is to buy a few of the rain barrels off eBay. Search for liquid tote or tote container or the like. These containers are normally used for shipping large amounts of oils/liquids on trucks/trains. Many sellers will let you pay a little extra to have them cleaned out. Otherwise, just do your best with a hose and everything will be ok.
You can expect to pay between $70 and $120 a piece on eBay if you look around. You’re going to pay a premium for shipping as they will be delivered via truck, but that’s just the way it is.

First, find a place near your existing downspout and drain to place the barrel. Then, setup and level a pad of cinder blocks on the soil around where you want to lay the tote. Make sure that the soil is compact and level. Then, place the tote on top of the cinder blocks when it arrives.
Next, you are going to need to intercept your regular downspout with some PVC. This will likely involve getting some PVC elbows and some lengths of 4″ and 2″ pipe. Here is how I connected mine.
I simply put an elbow on the top part to angle some 4″ PVC toward the tote, then, on the overflow return, jammed some 2″ PVC down the existing aluminum hookup to the gutter drain.
The most complicated part is setting up the connector on the top of the tote so that when you get a big downpour that overflows tote, extra water will flow back into your sewer system. I’m not going to bore you with a 1000 words about this, as a picture is worth more than 1000 words. So here it is.

The key here is to cut a hole in the plastic cap that comes with your tote and glue/attach a 4″ PVC connector to it. Then, get one of the screw-in 2″ PVC connectors, drill out a 2″ hole in the side and connect the 2″ PVC in the side of the 4″ PVC. Then, get some aluminum flashing, adjustable strap some window screen and attach as shown. When the water overflows, it goes down the 2″ pipe to the sewer.
Some notes to remember about the whole thing.. First, the barrel will weigh more than 1 ton, or about 2700 pounds when full. If you don’t compact your soil before placing the cinder blocks, the barrel will list to one side or the other when weighed down. Next, don’t seal all of your PVC joints until the very end. You can probably even get away not sealing them at all. Also, you will likely need a few connectors from your hardware stores to connect the large pipe at the base of the tote to your garden hose. Use plenty of caulk/silicon on the joints.
Well, that’s it, and good luck!
Android SDK – $25 and an hour later January 1, 2010 1 Comment
![]()
If you’ve ever had an inkling to get into mobile software development, now is your time. Google has drastically narrowed the gap for wanna-be mobile developers to get into this arena with their opensource and free Android SDK (Software Development Kit). Exciting new phones such as the, HTC “Google Phone”, Motorola Droid, Motorola Cliq and MyTouch are making a splash and diverting attention away from the all-consuming iPhone market.
Android does have a bit of an identity crisis going on, no doubt because of the openness of the platform and the freedom it provides to developers hoping to capitalize on it. The marketing buzz surrounding different phones and software like Droid, MyTouch, G1, Google Phone, MOTOBLUR, Android, etc. seem to have a lot of people disoriented and on the surface, it is a bit confusing. All of these products are really only variously branded versions of a base Android OS running on a phone with some custom apps pre-installed. Android apps that you write will generally work on all of these. Here’s a breakdown:
| Common Name | Platform | OS |
|---|---|---|
| Verizon Droid | Motorola phone with some custom apps | Android 2.0/2.1 |
| Google Phone | HTC Hero phone with some Google apps | Android 2.0/2.1 |
| T-Mobile MyTouch 3G | HTC phone with some Google apps | Android 1.5/1.6 |
| T-Mobile Cliq | Motorola M200 with some Motorola “MOTOBLUR” apps | Android 1.5/1.6 |
Motorola has written “MOTOBLUR” as an application layer for Android 1.5/1.6 on the Cliq that allows corporate Exchange sync and other stuff that lets you consolidate your different accounts from Facebook, etc. Droid is a more generic version of Android 2.0 which has Exchange syncing built-in along with built-in apps for integration to Google services. It seems likely that Motorola will upgrade “MOTOBLUR” to be Android 2.0 and sideline MOTOBLUR in the future as there is a bit of overlap between what Android 2.0 and MOTOBLUR try to accomplish.
The Android SDK is available for free to download and so is Eclipse and Java. The Android OS is based on a Linux kernel and the Android GUI and API are written in Java. You can get the development environment running under MacOS X, Windows and Linux and the included documentation is excellent. Java is what enables the Android application packages (.apk files) to be installed on any architecture phone. A comprehensive development environment built on top of Eclipse allows you to visually draw the layout for your Android app, then fill in the blanks with a mix of more Java and XML. A variety of libraries built into the Android API such as Apache HTTP libs make interacting with web-based services over cell networks very easy. Also unlike Apple, a complete “service” infrastructure allows you to write daemons/services that run in the background with ease. Android incorporates the lightweight opensource database system SQLite to deal with local data storage and includes a basic library much like a registry for storing application preferences and restoring previous states of apps.
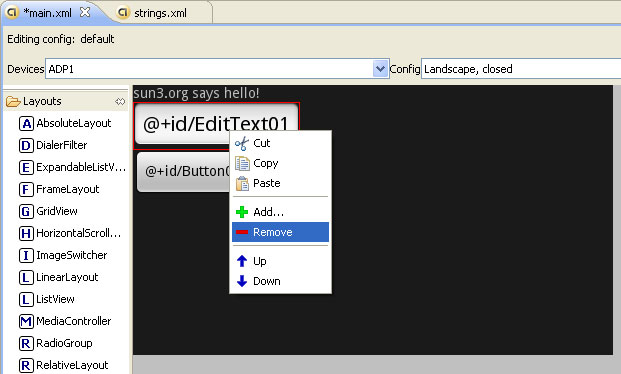
public void onCreate(Bundle savedInstanceState) { super.onCreate(savedInstanceState); TextView tv = new TextView(this); tv.setText("sun3.org says hello!"); setContentView(tv); // Start my custom service, if it is not running already startService(new Intent(this, AndroidConnectService.class)); } |
Within the SDK, you first need to become familiar with the terminology. For example, the GUI that you write is called an “Activity”, “Intents” are actions along with data (calls to activities/services) and the presentation/screen is a “Layout”, etc. Once you get familiar with the basic terminology of the Android SDK and poke around a little, a design philosophy in Android emerges regarding the sharing of access to your interfaces and services. The entire platform is designed to be very modular and to allow other developers to use your Activities and Services.
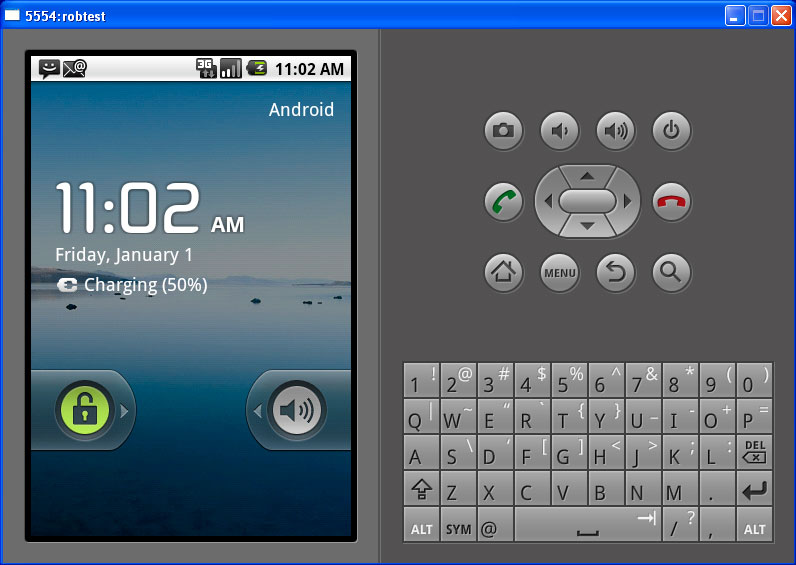
You don’t even need an Android phone to start your development, as the SDK comes with a complete emulator that lets you test your apps without the pain of installing your software on actual Android hardware every time you make a change. Incidentally, this is also a great way to test-drive Android without buying a phone or borrowing your friend’s phone.
Once you are ready to test out your app on a real phone, you’ll find that the Android OS allows you to download and install your .apk file directly from a web URL. Unlike Apple, the philosophy around Android app development is one of un-restricted access. Apple has a more restrictive App Store, and hackers need to “jail break” their phones before they can install non Apple-approved apps. Apple is only making it harder to jail break their phones. Presumably, Apple is trying to save people from themselves and their own distaste. Google has a different philosophy for Android, whereby they make the SDK components, the OS and source for the whole platform freely available and open to tinkering. It’s surprisingly easy to get an app working, tested and installed on your off-the-shelf Android phone. I had their included “helloworld” example running within about an hour, including downloading the SDK/Java JRE, poking around, compiling, testing on their emulator and installing on my regular phone.
So now you’re wondering where the $25 dollars comes in? The Android Marketplace asks $25 for you to become an official developer. This includes the ability to both upload and sell applications in the official Android Marketplace, which is akin to the Apple AppStore. Unlike Apple, there is little to no review (read “censoring”) of the apps that you sell at the Google Android Marketplace. The $25 is just to keep the spammers away. So, what are you waiting for? =)
praux.com API October 28, 2009 1 Comment

If you havn’t seen praux.com‘s fancy API, you should definitely have a look. Here’s an interface I put together that uses the API to display praux-hosted resumes on your own site. Praux is a new site that allows you to assemble, maintain and share your resume with others. The REST design and personal URLs at Praux allow you to reference, export and display your resume in many different ways. Here’s some code that uses the YAML feed of your praux.com resume, to render it on your own site. You will need the spyc YAML parser to use the below script. Have fun!
<? require_once("spyc.php"); $data = file_get_contents("http://your.url.praux.com/yaml/"); $resume = spyc_load_file($data); echo "<b>" . $resume[name] . "</b><br>"; echo "<b>" . $resume[email] . "</b><br>"; echo "<b>" . $resume[phone] . "</b><br><br>"; $sections = $resume[sections]; function recurse_child($child,$level=0,$lastout=false,$subsection=0) { $level++; if ($lastout==false) { $level--; } if (is_array($child)) { foreach ($child as $itemid => $item) { if (is_array($item[content_items])) { if ($item[content_items][0][body]) { echo "<span style='display:inline;position:relative;left:120px;'>"; echo str_repeat(" ",$level*8); echo "</span>"; echo "<div style='display:inline;position:relative;left:135px;'>"; echo "<span style='position:absolute;left:-15px;font-size:1.0em;'>"; echo "•"; echo "</span>"; echo trim($item[content_items][0][body]); echo "</div>"; echo "<br>\n"; $lastout=true; } if ($item[content_items][0][date_range]) { if ($subsection > 0) { echo "<br>"; } $subsection++; echo $item[content_items][0][date_range] . " "; echo "<span style='position:absolute;left:120px;'>"; if ($item[content_items][0][organization]) { echo "<b><i>" . $item[content_items][0][organization] . "</i></b>, "; } else { echo "<b><i>" . $item[content_items][0][title] . "</i></b>, "; } echo $item[content_items][0][locality]; echo "</span><br>"; echo "<span style='position:absolute;left:120px;'>"; echo $item[content_items][0][title]; echo "</span><br>"; } if (is_array($item[children])) { recurse_child($item[children],$level,$lastout,$subsection); } } } } } echo "<div style='position:absolute;width:600px;'>"; foreach ($resume[sections] as $sectionid => $section) { foreach ($section[content_blocks] as $blockid => $block) { echo "<span style='font-size:1.5em;'>" . $block[content_items][0][body] . "</span>"; echo "<span style='position:relative;'><hr></span><br>\n"; foreach ($block as $childid => $child) { recurse_child($child); } echo "<br>"; } } echo "</div>"; ?> |
Ubuntu (Dapper) on the PC Engines Alix 3D1 October 25, 2009 12 Comments

The Alix 3D1 is a small PC with an LX700 AMD Geode cpu. It costs $75 USD and can, with enough patience, run just about any mainstream Linux OS that you can think of. That is thanks to the AMD Geode processor, which is i386/x86 compatible, so you won’t need any special ARM distributions or the like to get the thing going.
This is a tutorial on installing specifically the Ubuntu Dapper distro on the Alix 3D1 with the help of a Windows PC.
For some reason mainstream Ubuntu installs after Dapper have issues completing the installation procedure and will likely cause problem for you. If you are able to install something released after Dapper, please let me know!
Where to buy an Alix 3D1
First of all, I’ll post some info about where to get the Alix 3D1. It is made by a company called PC Engines and there are 3 different versions of the board. The cheapest is the 3D1 ($75).
This tutorial also should apply to the 3D2 model. The 3D3 model has an Award BIOS and a VGA port, so things might be a little different with that one (and likely easier). Available distributors:
What you need to get with the Alix 3D1
The 3D1 comes in a cardboard box with nothing but the motherboard and some anti-static packaging, so you’re going to need to order a few accessories with it too:
- A power supply
- An enclosure. You can’t go wrong with the metal waterproof one, it’s very nice.
- If you’re planning on doing 802.11, you’ll want the type-N coaxial pigtails for any NICs you are adding to the 3D1’s 2 miniPCI slots.
- A Compact Flash (CF) card preferably about 4GB or larger
Total cost for the Alix 3D1, power supply, waterproof closure with mounts and 2 type-N 802.11 pigtails was only $146.90 USD.
Accessing the Serial Console

First thing you will need to do is to get access to the console on the 3D1. I’m using Windows, so the best terminal program out there (AFAIK) is PuTTY. You can download PuTTY from:
After you have PuTTY installed, you will need a serial cable with a null-modem adapter. Connect the serial cable with null-modem to the 3D1 to your Windows PC and start up PuTTY. Select ‘Serial’ for connection type and put the baud rate at 38400 and type in the COM port (COM[1-X]). 38400 is the default baud rate of the 3D1.
PC Engines ALIX.3 v0.99 640 KB Base Memory 130048 KB Extended Memory 01F0 Master 848A SAMSUNG CF/ATA Phys C/H/S 992/16/32 Log C/H/S 992/16/32 |
Booting Ubuntu (Dapper) via PXE
 The best way I’ve found to load a Linux distro on the box is to use the built-in PXE boot functionality of the BIOS. When the BIOS on the 3D1 boots, it does a DHCP broadcast to find any available PXE boot servers out there. You don’t have to worry about other DHCP servers on your network responding unless they are especially setup to do PXE. PXE uses your specialized DHCP server + TFTP (setup below) to bootstrap the device. If everything is setup correctly below, your DHCP server responds and provides an image for the device to download and run (bootstrap). After the image is downloaded and executed, then the fun begins.
This seems like a lot of stuff to get configured to do this, but luckily, there is some software that makes this pretty straight foward. The best utility I’ve found to do this a Windows program called TFTPD32:
You will first need to prepare a directory on your Windows PC for the TFTP server to serve out a kernel and a boot image. Create a directory on your windows machine for the files. I called mine C:\tftpd.
Downloading and preparing Ubuntu Dapper netboot.tar.gz
Download the following package to your C:\tftpd directory:
 You will need a program to unzip .gz and extrat .tar files. A great one for Windows is 7-Zip, which is available here:
After the archive is in the directory, extract the .gz, then the .tar underneath the c:\tftpd directory. After this is done, you’re ready to prepare your TFTP and DHCP servers.
Setting up TFTPD32
You will need to setup your TFTPD32 application as follows. You are going to need to enable ‘PXE Compatibility‘ as well as make sure that DHCP and TFTPD servers are enabled. Also, be sure to set the path correctly for your ‘base directory‘ as shown, as well as setup your new DHCP server to give normal addresses on your network. The DHCP server that you setup here will serve up the correct boot image when an address is given out to the 3D1. There is an area to to input what image you want to provide to new DHCP hosts. In this textbox under the DHCP tab of TFTPD32, enter ‘pxelinux.0‘. Make sure that your default gateway, actual DNS server, subnet and IP ranges all make sense in the configuration. If you have problems getting PXE booting to work, be sure to look at your logs tabs. They are invaluable for debugging what is wrong.

Starting up the Alix 3D1!
When you first startup the 3D1, you are going to need to modify the BIOS config to allow PXE booting. To do this, type ‘S’ when the 3D1 is testing memory. This should bring up a menu of options. To toggle PXE booting, type ‘N’, then save the configuration to the BIOS.
PC Engines ALIX.3 v0.99 640 KB Base Memory 130048 KB Extended Memory 01F0 Master 848A SAMSUNG CF/ATA Phys C/H/S 992/16/32 Log C/H/S 992/16/32 BIOS setup: (9) 9600 baud (2) 19200 baud *3* 38400 baud (5) 57600 baud (1) 115200 baud *C* CHS mode (L) LBA mode (W) HDD wait (V) HDD slave (U) UDMA enable (M) MFGPT workaround (P) late PCI init *R* Serial console enable *E* PXE boot enable (X) Xmodem upload (Q) Quit Save changes Y/N ? Writing setup to flash... |
When the 3D1 boots back up it, should start checking for a DHCP server, see the TFTPD services you have running, grab an available IP address from your DHCP server and start to load the kernel.
PC Engines ALIX.3 v0.99 640 KB Base Memory 130048 KB Extended Memory 01F0 Master 848A SAMSUNG CF/ATA Phys C/H/S 992/16/32 Log C/H/S 992/16/32 Intel UNDI, PXE-2.0 (build 082) Copyright (C) 1997,1998,1999 Intel Corporation VIA Rhine III Management Adapter v2.43 (2005/12/15) CLIENT MAC ADDR: 00 0D B9 13 CD 7C CLIENT IP: 192.169.0.20 MASK: 255.255.255.0 DHCP IP: 192.169.0.250 GATEWAY IP: 192.169.0.1 |
Monitoring the TFTPD32 Logs
You should now see some activity in the TFTPD32 logs. The following would be a good sign:
Read request for file <pxelinux.cfg/default>. Mode octet [25/10 17:20:35.078] OACK: <tsize=1821,> [25/10 17:20:35.078] Using local port 2360 [25/10 17:20:35.078] <pxelinux.cfg\default>: sent 4 blks, 1821 bytes in 0 s. 0 blk resent [25/10 17:20:35.140] Connection received from 192.169.0.20 on port 57099 [25/10 17:20:35.140] Read request for file <ubuntu-installer/i386/boot-screens/boot.txt>. Mode octet [25/10 17:20:35.140] OACK: <tsize=301,> [25/10 17:20:35.156] Using local port 2361 [25/10 17:20:35.156] Connection received from 192.169.0.20 on port 57100 [25/10 17:20:35.234] <ubuntu-installer\i386\boot-screens\boot.txt>: sent 1 blk, 301 bytes in 0 s. 0 blk resent [25/10 17:20:35.234] Read request for file <ubuntu-installer/i386/boot-screens/splash.rle>. Mode octet [25/10 17:20:35.250] OACK: <tsize=8023,> [25/10 17:20:35.250] Using local port 2362 [25/10 17:20:35.250] TIMEOUT waiting for Ack block #0 [25/10 17:20:50.343] |
Ok, here’s the tricky part
Ubuntu will by default try and send the console output to a VGA source. Since there is not a VGA source on the 3D1, you are going to have to do tell it to send the console to the serial port. Problem is, you cannot see that it is currently at a boot prompt asking you what to do. In the TFTPD server logs, you should be able to see that it has grabbed the pxelinux.0 file and is waiting on something. This is your queue!. Type into PuTTY the following (you will not be able to see the output of your typing):
linux console=ttyS0,38400 |
..and hit Enter.

Within about 10 seconds, you should see the console outputting to your PuTTY window and the kernel booting. Your 3C1 should now have a valid IP, Netmask, router and DNS server configuration and it should continue to install Ubuntu from the Ubuntu network archives server. The rest is a piece of cake!
Credits
The following site(s) were very helpful in creating this tutorial
GroupWise 6.5 to Zimbra AddressBook August 22, 2009 No Comments
Here is some code to translate a GroupWise 6.5 address book into a format that Zimbra can understand.
nab2zimbra.php
<?php function get_value_by_mapi($zimbraid, $nabid,$nabvalues,$nabfields) { if ($nabid == "") { return ""; } for ($i=0;$i<sizeof($nabfields);$i++) { if ($nabfields[$i][mapitag] == $nabid) { return $nabvalues[$i]; } } } if (count($argv) < 2) { echo "Usage: php nab2zimbra.php <input_file.nab> \n"; } else { $inputfile = trim($argv[1]); if (file_exists($inputfile)) { $row = 1; $handle = fopen($inputfile, "r"); /* :::TAGMAP:::0FFE0003:***, 3001001E:Name, 3A08001E:Office Phone Number, 3A18001E:Department, 3A23001E:Fax Number, 3003001E:E-Mail Address, 3A06001E:First Name, 3A11001E:Last Name, 3A17001E:Title, 3A29001E:Address, 3A27001E:City, 3A28001E:State, 3A26001E:Country, 3A2A001E:ZIP Code, 3002001E:E-Mail Type, 3A19001E:Mailstop, 3A09001E:Home Phone Number, 3A1C001E:Cellular Phone Number, 3A21001E:Pager Number, 3A1A001E:Phone Number, 600B001E:Greeting, 600F001E:Owner, 3A16001E:Organization, 3004001E:Comments, 3A00001E:User ID, 6604001E:Domain, 6609001E:Additional Routing, 6605001E:Post Office, 6603001E:GUID, 6607001E:eDirectory Distinguished Name, 6608001E:Network ID, 660D001E:Internet Domain, 660E001E:AIM/IM Screen Name, 3A45001E:Prefix, 3A44001E:Middle Name, 3A05001E:Generation, 3A5D001E:Home Address, 3A59001E:Home City, 3A5C001E:Home State, 3A5B001E:Home ZIP, 3A5A001E:Home Country, 3A50001E:Personal Web Site, 3A51001E:Office Web Site, 6612001E:Resource Type, 6615001E:Primary Contact Name */ // First go through the input file and load an associative array with mapped MAPI tags $fields = array(); while (($data = fgetcsv($handle, 1000, ",")) !== FALSE) { if ($row==1) { $num = count($data); $row++; // This should be the header line $fieldmap = array(); for ($c=0; $c < $num; $c++) { $thismapitag = ""; $exploded = explode(":",$data[$c]); $thismapitag = $exploded[0]; $fieldmap[$c][value] = $exploded[1]; $fieldmap[$c][mapitag] = $thismapitag; } } else { $num = count($data); $row++; for ($c=0; $c < $num; $c++) { // Zimbra mapping /* birthday company = 3A16001E department = 3A18001E dlist email = 3003001E email2 email3 fileAs = 1,2,3 firstName = 3A06001E fullName = 3001001E homeCity = 3A59001E homeCountry = 3A5A001E homeFax = homePhone = 3A09001E homePhone2 homePostalCode = 3A5B001E homeState = 3A5C001E homeStreet = 3A5D001E homeURL = 3A50001E initials jobTitle = 3A17001E lastName = 3A11001E middleName = 3A44001E mobilePhone = 3A1C001E nickname notes = 3004001E pager = 3A21001E type workCity = 3A27001E workFax = 3A23001E workPhone = 3A08001E workPhone2 workPostalCode = 3A2A001E workState = 3A28001E workStreet = 3A29001E workURL = 3A51001E */ $fields[$row][$c] = $data[$c]; } } } fclose($handle); // Ok, now build the header row: $zimbraheader = array("birthday","company","department","dlist","email","email2","email3","fileAs","firstName", "fullName","homeCity","homeCountry","homeFax","homePhone","homePhone2","homePostalCode","homeState","homeStreet","homeURL","initials","jobTitle","lastName","middleName","mobilePhone", "nickname","notes","pager","type","workCity","workFax","workPhone","workPhone2","workPostalCode","workState","workStreet","workURL"); for ($i=0;$i<sizeof($zimbraheader);$i++) { echo $zimbraheader[$i] . ","; } echo "\n"; // Loop through all the input rows foreach ($fields as $key => $val) { $nabfields = $fieldmap; $nabvalues = $fields[$key]; // Only import people objects, not company objects. if ($nabvalues[0] == "U") { echo get_value_by_mapi("birthday", "",$nabvalues,$nabfields) . ","; echo get_value_by_mapi("company", "3A16001E",$nabvalues,$nabfields) . ","; echo get_value_by_mapi("department", "3A18001E",$nabvalues,$nabfields) . ","; echo get_value_by_mapi("dlist", "",$nabvalues,$nabfields) . ","; echo get_value_by_mapi("email", "3003001E",$nabvalues,$nabfields) . ","; echo get_value_by_mapi("email2", "",$nabvalues,$nabfields) . ","; echo get_value_by_mapi("email3", "",$nabvalues,$nabfields) . ","; echo get_value_by_mapi("fileAs", "",$nabvalues,$nabfields) . ","; echo get_value_by_mapi("firstName", "3A06001E",$nabvalues,$nabfields) . ","; echo get_value_by_mapi("fullName", "3001001E",$nabvalues,$nabfields) . ","; echo get_value_by_mapi("homeCity", "3A59001E",$nabvalues,$nabfields) . ","; echo get_value_by_mapi("homeCountry", "3A5A001E",$nabvalues,$nabfields) . ","; echo get_value_by_mapi("homeFax", "",$nabvalues,$nabfields) . ","; echo get_value_by_mapi("homePhone", "3A09001E",$nabvalues,$nabfields) . ","; echo get_value_by_mapi("homePhone2", "",$nabvalues,$nabfields) . ","; echo get_value_by_mapi("homePostalCode", "3A5B001E",$nabvalues,$nabfields) . ","; echo get_value_by_mapi("homeState", "3A5C001E",$nabvalues,$nabfields) . ","; echo get_value_by_mapi("homeStreet", "3A5D001E",$nabvalues,$nabfields) . ","; echo get_value_by_mapi("homeURL", "3A50001E",$nabvalues,$nabfields) . ","; echo get_value_by_mapi("initials", "",$nabvalues,$nabfields) . ","; echo get_value_by_mapi("jobTitle", "3A17001E",$nabvalues,$nabfields) . ","; echo get_value_by_mapi("lastName", "3A11001E",$nabvalues,$nabfields) . ","; echo get_value_by_mapi("middleName", "3A44001E",$nabvalues,$nabfields) . ","; echo get_value_by_mapi("mobilePhone", "3A1C001E",$nabvalues,$nabfields) . ","; echo get_value_by_mapi("nickname", "",$nabvalues,$nabfields) . ","; echo get_value_by_mapi("notes", "3004001E",$nabvalues,$nabfields) . ","; echo get_value_by_mapi("pager", "3A21001E",$nabvalues,$nabfields) . ","; echo get_value_by_mapi("type", "",$nabvalues,$nabfields) . ","; echo get_value_by_mapi("workCity", "3A27001E",$nabvalues,$nabfields) . ","; echo get_value_by_mapi("workFax", "3A23001E",$nabvalues,$nabfields) . ","; echo get_value_by_mapi("workPhone", "3A08001E",$nabvalues,$nabfields) . ","; echo get_value_by_mapi("workPhone2", "",$nabvalues,$nabfields) . ","; echo get_value_by_mapi("workPostalCode", "3A2A001E",$nabvalues,$nabfields) . ","; echo get_value_by_mapi("workState", "3A28001E",$nabvalues,$nabfields) . ","; echo get_value_by_mapi("workStreet", "3A29001E",$nabvalues,$nabfields) . ","; echo get_value_by_mapi("workURL", "3A51001E",$nabvalues,$nabfields) . ","; echo "\n"; } } } else { echo "Could not find input file: " . $inputfile . " \n"; } } ?> |
Favorite EBay Searches January 19, 2009 No Comments
EBay is a place that lacks description. It is a staple of the Internet, and is often criticized for being a hodge-podge outlet that resembles a dollar store. However, there are treasures that can be found on EBay that extend well beyond what can be purchased at your local store. Now, I know you can probably find lots of crazy things for sale at specialized Internet stores.. But really, where else but EBay can you find 100’s of vendors selling them in an atmosphere of free market competition? Here are a few of my favorite EBay searches and some information about them.
Ancient Roman Stuff
Ancient Roman artifacts are plentiful on Ebay. The Roman empire lasted nearly 1200 years and encompassed, at its peak, nearly 2.3 million square miles of what is now the general area known as Europe. 88 million people called Rome their capital, at the peak. The peak of the Roman civilization lasted from 27 BC – AD 476, that’s a minimum 1,533 years ago. Museums are filled with the best of Roman stuff. So much so, that they rarely accept new artifacts, unless they are exceptional. What that means for you is that you can have an incredible piece of history for almost nothing. One of the common pieces of Roman history sold on EBay are ancient roman coins. These coins come in a variety of states and conditions. They are often sold “uncleaned”, which means that the people who found them (often with a metal detector in “hordes”), have not stripped the corrosion from their surface. However, you can be quite assured that they have kept any pieces that are gold or silver.
About a year ago, I got mildly curious about these coins and ordered a set of 20 or so un-cleaned Roman coins. After following the detailed directions for cleaning that came with the coins, I found about 1/4 of them cleaned reasonably well. Here is a detail of one of these coins. I have no idea who/from where the militant looking guy or lady is on the surface, but it was a lot of fun for about $10 bucks.
A Roman coin that I cleaned

Search ‘Ancient Roman’ on Ebay
Surgical Supplies
You simply cannot find some treasures at your local retail outlets, or anywhere else for that matter. This includes stuff like surgical sutures. You or someone you know has probably been in situation where you were far away from medical help and needed it quickly. Unfortunately, many medical establishments, especially those in the US figure that you are an absolute idiot and can’t tend to your own body or that of someone else, without a 10 year degree. With a little bit of You Tube training, you can easily suture an open wound and maybe save someone from disfigurement or death from loss of blood. The only problem is that you can’t buy the basic supplies needed to tie a suture, a med school 101 procedure. At least in the US, your local pharmacy doesn’t carry this stuff. But on EBay, it’s a click away.

Search ‘suture’ on EBay
Well, that’s it for now. I’ll be sure to be back with more EBay treasures soon =)
iCAMView Pro November 27, 2008 1 Comment
If you’ve ever searched on eBay or Google for IP-based camera security things, you’ve undoubtedly seen advertisements for these little plastic USB camera servers called the iCAMView. I finally got curious about these things and ordered one off eBay. I’ll admit, they’re really impressive. One of the downfalls of many IP-based cameras and camera servers is always the software. In general, you get what you pay for in this regard. However, the iCAMView device software is excellent.
The one thing that grabbed my attention about the iCAMView is that they recently released a new version of the device called the “iCAMView Pro”, which can use higher resolution USB cameras. Image resolution is one of my pet peeves and largely why I generally choose to stay away USB-based camera servers.

Once I started testing the device, a few things caught my eye. First, there is an option to automatically reboot the device at a specified interval. Most manufacturers of these things have some ridiculous idea that their devices will stay running indefinitely, without rebooting. I’ve tested many IP camera devices and they universally eventually lock up or start running slow. At least the iCAMView people were humble enough to add this option.
Secondly, you can plug a USB storage device into the thing for local storage. It even manages old files and deletes them when the storage hits a user-specified limit. This is another thing they added to the software to make the device a “set it and forget it” camera server.
Third, it’s fast! I don’t know how they manage to put a full web server packed with features such as motion detection in such as small package, but it’s amazing how responsive the web interface is, even when it’s actively capturing photographs.
Fourth, it supports many wireless USB dongles and even supports WEP encryption/keys.
Overall, the device is very impressive and well worth a look. It has user upgradable firmware and I’ll soon be testing the higher resolution USB cameras with it.